You will need to register to access the IPONZ online case management facility for Patents, Trade Marks, Designs or Plant Variety Rights. To do this, you must:
- Create a RealMe® login (if you don’t already have one);
- Use your RealMe® login to set up an IPONZ account, and link this account to a legal entity.
- Set up a legal entity as the default client for your account.
The video opens on a title card showing the Intellectual Property Office of New Zealand logo. This fades to another screen showing the words “Becoming a registered user of IPONZ”.
We see a man standing in an office space, wearing a hat and jacket. He talks directly to the camera “If you're looking to apply for any intellectual property type with the Intellectual Property Office of New Zealand, you'll need to get set up on their website. There are a few steps to get up and running, so let's walk through them. IPONZ uses RealMe® to sign in to the website.”
We see a woman sitting at a desk using a laptop. The man continues speaking as a user signing up to RealMe®, and a user resetting their password. “If you don’t have one already, start by creating a RealMe® login account. If you already have a RealMe® login, but you've forgotten your username or password, click Log in on our website and use the Forgot Username or Forgot Password links. As long as you have your email address or phone number you used to set up your RealMe® account, you should be able to get your login details.”
We alternate between seeing the man speaking to camera, and a user choosing the options to set up their IPONZ account on screen. “Once you have your RealMe® account sorted, you can log onto the IPONZ case management facility and set up your IPONZ account. The prompts should make the next steps clear. You'll just need to select from a few options.”
“Option 1: I am a new user with an activation code from my organisation. Choose this option if your organisation has an administrator who's overseeing your organization's access to the IPONZ system. Your administrator can send you an activation code that will join your new account to your organisation.”
“Option 2: I am a new user representing myself or an organisation, which is new to IPONZ. Choose this option if you or your organisation have not previously filed any applications with IPONZ. This will set up a new IPONZ account that you can use to file applications or requests for yourself or your organisation.”
“Option 3: I am a new user representing myself or an organisation which has previously filed an application with IPONZ. Choose this option if you or your organisation has an existing application or registration with IPONZ. You can link your new account to the existing records.”
The man continues speaking to camera. “ Okay, great. Now you're ready to set up your Client ID and choose a default client for your account. The transactions you make on your account are automatically listed under your default client. You can choose to use another Client ID or change your default one if you want to.”
“For example, if part of your job means that you're tasked with filing patent applications for the company you work for, you will probably have this as your default client.”
We see a woman sitting at a desk using a laptop as the man continues speaking, then see him again. “But you'll also have a trade mark for your own business, you can switch between the company you work for and yourself personally. This means the correct owner is listed on any IP you apply for in the future.”
We see a user navigating the IPONZ case management system to choose a default client as the man continues describing the steps to take. “To choose a default client for your account, go to your inbox. Then under My Account, select My Profile. You'll be taken to a new page with a User's Data tab. Under Default Client, hit Search. Pick your preferred entity from the list by ticking the circle to the left. Then click the Select button. This will return you to your profile page with the entity selected. We're there. Click the Submit button on the lower right corner of the page to save your default client settings.”
We see the man speaking again. “Now that's done. You're ready to apply for a trade mark or access the IPONZ services. Check out our other videos for more info on these.”
The image cuts to an end title screen showing the Intellectual Property Office of New Zealand and Digital Boost logos. The text on screen lists the IPONZ contact phone numbers, “Freephone within New Zealand 0508 447 669, Freephone from Australia 1800 796 338, International callers +64 3 962 2607”. The man continues speaking “Still have questions? The Intellectual Property Office of New Zealand is open between 8:30 AM and 5:00 PM Monday to Friday.”
The text changes to show the website address of the contact us page on the IPONZ website with the words “For less urgent matters iponz.govt.nz/contact-us We’ll be in touch within 7 working days” and the man continues speaking “For less urgent matters, you can head to the Contact Us page on the IPONZ website. We should be in touch within seven working days. The Contact Us page also has a Common Queries section, so be sure to check this out in case it addresses your question or concern.”
The video finishes by showing the logo of the Ministry of Business, Innovation and Employment, and the logo of the New Zealand Government.
If you wish to establish an IPONZ account so that you can perform actions under an organisation’s name, please check with your organisation first. Your organisation may already have an established primary contact in the IPONZ online case management facility, who can then create an account for you.
Note that you don’t need to be an IPONZ registered user or have a RealMe® login to apply to register a Geographical Indication.
1. Create a RealMe® login
You must have a RealMe® account in order to use the IPONZ case management facility. If you are already using your RealMe® account to access other Ministry of Business, Innovation and Employment websites (such as the New Zealand Companies Office), you will be able to use this to access the IPONZ system.
Note if you have more than one RealMe® account, cases that are accessible under one of those accounts may not be accessible under the other.
As of April 2021, RealMe® services are no longer accessible through an Internet Explorer browser. If you wish to use RealMe® services, please use or download a different internet browser, such as Microsoft Edge or Google Chrome.
RealMe® compatible browsers and operating systems – RealMe®
To create a RealMe® account (if you do not have one already):
1. Select the Login button near the top right corner of the IPONZ website. This will bring you to a RealMe® login page.
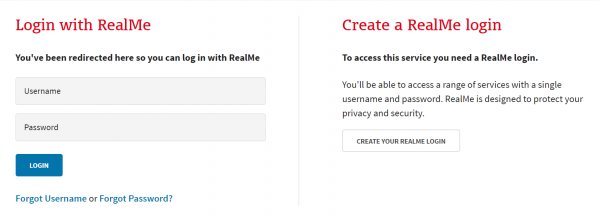
2. Click the Create your RealMe login button. This will bring you to a Set up your account form.
3. Complete and submit the Set up your account form.
2. Set up your IPONZ account
If you have followed the above steps to create a new RealMe® account, you will be immediately prompted to set up your IPONZ account via the steps below.
If you have an existing RealMe® account, you will need to log into the IPONZ online case management facility using your RealMe® username and password. This will prompt you to set up your IPONZ account via the steps below.

In the Select the option which best describes you page, you must choose one of the following options:
I am a new user with an activation code from my organisation
Choose this option if your organisation has an administrator who is overseeing your access to the IPONZ system. This administrator would have sent you an email with an activation code.
To complete your IPONZ account setup:
- Select I am a new user with an activation code from my organisation, then click the Submit button on the lower right corner of the page. This will prompt you to enter your activation code.
- Enter your activation code in the Input activation code field, then click the Continue button.
- If your activation code is correct, this will bring you to a Create your private profile page. Enter your personal details and click the Submit button on the lower right corner of the page to complete your account setup.
If you are not prompted to enter an activation code even after selecting the corresponding option, please contact us for assistance.
Once you have completed your account setup, please advise the administrator for your organisation. Your administrator may provide you with details on your organisation’s use of the IPONZ online case management facility.
I am a new user representing myself or an organisation, which is new to IPONZ
Choose this option if you or your organisation have not previously filed any applications with IPONZ. This will set up a new IPONZ account that you can use to file applications or requests for yourself or your organisation. You will need to enter details for both of the following:
- Your private profile (as the user of this IPONZ account); and
- Your public profile. This is the legal entity under which you will be filing your applications or requests. This legal entity can reflect either you (as an individual), or the organisation you are affiliated with.
Because you’re the one creating the account for yourself or your organisation, you will automatically be considered to be its primary contact (or "superuser").
To complete your IPONZ account setup:
- Select I am a new user representing myself or an organisation, which is new to IPONZ, then click the Submit button on the lower right corner of the page. This will bring you to a Create your private profile page.
- In the Create your private profile page, enter your personal details and click the Submit button. This will create your private profile and bring you to a Create your public profile page.
- In the Create your private profile page, enter the details of your legal entity. This is the entity whose name will appear when you file your applications and requests.
- Click on the Type drop-down box to select the most appropriate category for your legal entity – whether this reflects you as an individual person, is a New Zealand Registered Business, is an Overseas Business, or similar.
- If you are setting up a New Zealand Registered Business, you must enter its name or NZBN under the Search NZBN Register field. This will search the New Zealand Business Number register for your company and automatically complete the remainder of this form.
- You may click on the Add New Address button to add a physical, postal or service address. Remember to Save your address before adding a new one.
- Note that if you own (or intend to own) any intellectual property rights in New Zealand, your legal entity must at least have an address for service in New Zealand or Australia.
- Click on the Type drop-down box to select the most appropriate category for your legal entity – whether this reflects you as an individual person, is a New Zealand Registered Business, is an Overseas Business, or similar.
- Once you have completed entering your details, click the Submit button on the lower right corner of the page to create your public profile.
If your legal entity is an organisation, you may also create IPONZ accounts for other members of that organisation. This will allow those members to log in and perform actions under that organisation’s name. For more information on this, please see Create and maintain users for an organisation.
I am a new user representing myself or an organisation which has previously filed an application with IPONZ
Choose this option if you or your organisation already has an existing intellectual property rights application or registration with IPONZ. If this is the case, the IPONZ online case management facility may already have a record of you or your organisation. This will set up an IPONZ account that will be linked to the record of that legal entity.
Note that if there is an existing primary contact who is linked to your organisation’s record with us, this option will replace that primary contact with your login account. Please verify if your organisation has any existing contacts, administrators, or linked accounts before you proceed.
You will need to submit a completed Client Access Account Authorisation form [PDF, 328 KB] as part of this option.
To complete your IPONZ account setup:
- Select I am a new user representing myself or an organisation which has previously filed an application with IPONZ, then click the Submit button on the lower right corner of the page. This will bring you to a Create your private profile page.
- In the Create your profile page, enter your personal details and click the Submit button. This will create your private profile and bring you to a Request to be linked to existing client search page.
- Search for and select the existing legal entity to which you would like to link your account.
- If your search produces only one result, this will automatically open the profile page for that entity.
- If your search produces multiple results, tick the circle to the left of the correct result, then click the Select button to open the profile page for that entity.
- In the entity’s profile page, under the Client Authority section, click the Request to be linked to this client button.
- Note that this section may indicate that the entity is linked to an existing user. Your request will therefore replace that existing contact with your account.
- Click the Add Document button to upload a copy of your completed Client Access Account Authorisation form, then click the Continue button to return to your company’s profile.
- Click the Submit button on the lower right corner of the page to submit your linking request.
Once we have received your linking request, we will process this within one working day. You will then be able to access the intellectual property records of this entity and file applications under its name.
3. Set up a default client for your account
Before using your IPONZ account to file applications and requests, you must designate a legal entity to act as its ‘default client’. This will ensure that any transactions you perform with this account are listed under the name of this legal entity by default, which will be accountable for that transaction.
You can only designate a legal entity as your default client if your IPONZ account is linked to that legal entity.
If you have created your IPONZ account by means of an activation code, the default client for your account will be managed by your organisation’s administrators.
To designate a default client for your account:
- In your Inbox, under My Account, select My Profile. This will bring you to a My Profile page.
- In the User’s Data tab, under Default Client, click the Search button. This will bring you to a page that contains all entities to which your account is linked.
- Select your preferred entity from the list by ticking the circle to its left, then click the Select button. This will return you to your My Profile page with that entity selected.
- Click the Submit button on the lower right corner of the page to save your new default client settings.
Retrieve your username or reset your password
If you have forgotten your RealMe® username and/or password, you may try visiting the RealMe® login screen. This screen will contain a Forgot Username link that you can use to retrieve your username, and a Forgot Password link that you can use to reset your password.
Please note that your use of these links may be subject to security settings that you have applied to your RealMe® account. For example, you may be required to answer one or more security questions, or enter a verification code.
If you are unable to retrieve or reset your login credentials, please contact us for assistance.
Maintain your IPONZ account details
You can update the name and email address of your IPONZ account by logging in and visiting the My Profile page of your Inbox. This page will also allow you to add, edit or remove your personal phone contact information.
If your IPONZ account is linked to more than one legal entity (and you are not a member user of an organisation), you may also change the legal entity that is designated as the default client for your account.
To update these details of your IPONZ account:
- Log into the IPONZ online case management facility.
- In your Inbox, open the My Account section of your left hand menu, then select My Profile.
- In the User's Data tab:
- Make any changes to your name, email address, or phone contact information.
- Under Default Client, click the Select button to search for and select the new legal entity you wish you designate as your default client. Once you’ve selected a new default client, the details of this legal entity will appear under this section.
- Click the Submit button on the lower right corner of the screen to save your changes.
Maintain your RealMe® login and account details
If you wish to change your RealMe® account details – including your username and/or password – please visit the RealMe® website. You will need to log in to make changes to your account.
Create multiple user accounts that are all part of the same organisation
If you are part of a larger organisation, you can create a structure of accounts so that:
- Multiple users from your organisation can view and maintain its cases in our online case management facility.
- Multiple users from your organisation can file new applications or requests in our case management facility under your organisation’s name.
This will allow each of your contacts to have their own login account. Please do not share account login details for the IPONZ online case management facility.
To do this, you will need to establish a superuser as the primary contact for your organisation. This superuser should be the user account that is directly linked to your organisation’s ID in our online case management facility. Your superuser can then create and manage secondary user accounts for other members of your organisation.
For more information about establishing a superuser and creating multiple user accounts for a single organisation, see Create and maintain users for an organisation.